Hi Friends ,
By this post we are going to learn about how to set up Android Google map V2 .
Important thing in this set up is "Get your SHA1 fingerprint " . So we will see the latest and simplest way .
1. Just Create one New Android Application .with Latest Google Map Api as the Target.
2. Import Google Play Services Lib . Which will be available in below path of your Android SDK
android-sdk\extras\google\google_play_services\libproject\google-play-services_lib
3. Add google play service lib to your project by right clicking on your project properties\android and you will see little button on the buttom-right "add". Just add the google play service lib and click ok. like below image.
Window\Preferences Android\Build
find your SHA1 fingerprint and copy that.See the Reference Image . Copy the SHA1 finger print for future use.

7. Activate the option "Google Maps Android API V2" See below for Reference.
8. Click "Create New Android Key" . You will get below Popup.
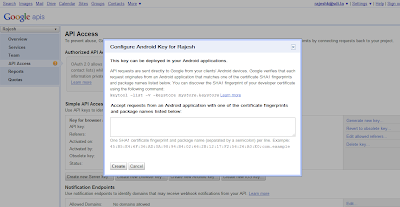
9. Enter your SHA1 fingerprint(Which you have saved earlier ) followed by ' ; ' and your application package name.
like this . 40:8F:34:9C:F2:FC:7A: ; com.rajesh.map.sample
After pasting click the Create button.
10. The following permission are Must for Map v2 project.
Hope this helps you. Happy Coding .
By this post we are going to learn about how to set up Android Google map V2 .
Important thing in this set up is "Get your SHA1 fingerprint " . So we will see the latest and simplest way .
1. Just Create one New Android Application .with Latest Google Map Api as the Target.
2. Import Google Play Services Lib . Which will be available in below path of your Android SDK
android-sdk\extras\google\google_play_services\libproject\google-play-services_lib
3. Add google play service lib to your project by right clicking on your project properties\android and you will see little button on the buttom-right "add". Just add the google play service lib and click ok. like below image.
4. How to get SHA1 fingerprint KEY
Go to:Window\Preferences Android\Build
find your SHA1 fingerprint and copy that.See the Reference Image . Copy the SHA1 finger print for future use.
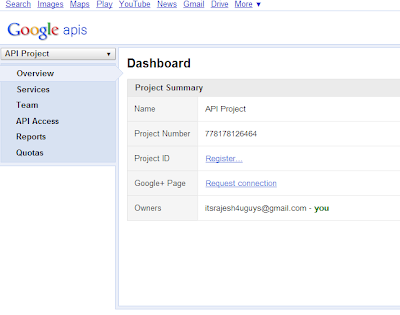
5. Go to Google Apis Console Window. See below for Reference.
6.Create New project .See below for Reference. 
7. Activate the option "Google Maps Android API V2" See below for Reference.
8. Click "Create New Android Key" . You will get below Popup.
like this . 40:8F:34:9C:F2:FC:7A: ; com.rajesh.map.sample
After pasting click the Create button.
10. The following permission are Must for Map v2 project.
 <permission
        android:name="com.example.osman.permission.MAPS_RECEIVE"
        android:protectionLevel="signature"/>
<uses-permission android:name="com.example.osman.permission.MAPS_RECEIVE"/>

<uses-permission android:name="android.permission.INTERNET"/>
<uses-permission android:name="android.permission.ACCESS_NETWORK_STATE"/>
<uses-permission android:name="android.permission.WRITE_EXTERNAL_STORAGE"/>
<uses-permission android:name="com.google.android.providers.gsf.permission.READ_GSERVICES"/>
<!-- The following two permissions are not required to use
     Google Maps Android API v2, but are recommended. -->
<uses-permission android:name="android.permission.ACCESS_COARSE_LOCATION"/>
<uses-permission android:name="android.permission.ACCESS_FINE_LOCATION"/>

<uses-feature
        android:glEsVersion="0x00020000"
        android:required="true"/>
Along with the you must add the below lines
      <meta-data
    android:name="com.google.android.maps.v2.API_KEY"
    android:value="YOUR_KEY"/>// the key is which you have got from step 9.
Add above line right before the </application> tag
Hope this helps you. Happy Coding .


No comments:
Post a Comment